
There’s nothing quite like the sizzle of a perfectly grilled steak or the aroma of fresh vegetables cooking over an open flame while you’re surrounded by the beauty of your own backyard. I’ve always dreamed of having my own outdoor kitchen – a space where I could entertain friends, cook family meals under the stars, and create memories that last a lifetime.
The outdoor kitchen trend has absolutely exploded in recent years, and for good reason. These spaces extend our living areas beyond the confines of our homes, allowing us to embrace outdoor cooking and entertaining in ways that make every meal feel like a special occasion. Whether you’re hosting a summer barbecue for twenty or enjoying an intimate dinner for two, an outdoor kitchen becomes the heart of your backyard oasis.
But here’s the thing – having a professional contractor design and build your outdoor kitchen can easily cost $15,000 to $50,000 or more. That’s where DIY comes to the rescue! I’ve spent countless hours researching and discovering incredible DIY outdoor kitchen plans that deliver professional-looking results at a fraction of the cost.
In this comprehensive guide, I’m sharing 15 amazing DIY outdoor kitchen plans that you can build yourself, many in just a weekend or two. From simple grilling islands to elaborate setups with pizza ovens, concrete countertops, and full bars, these projects range from beginner-friendly to intermediate skill levels. Each plan includes practical tips, material suggestions, and step-by-step guidance to help you create the outdoor cooking space you’ve always wanted without breaking the bank.
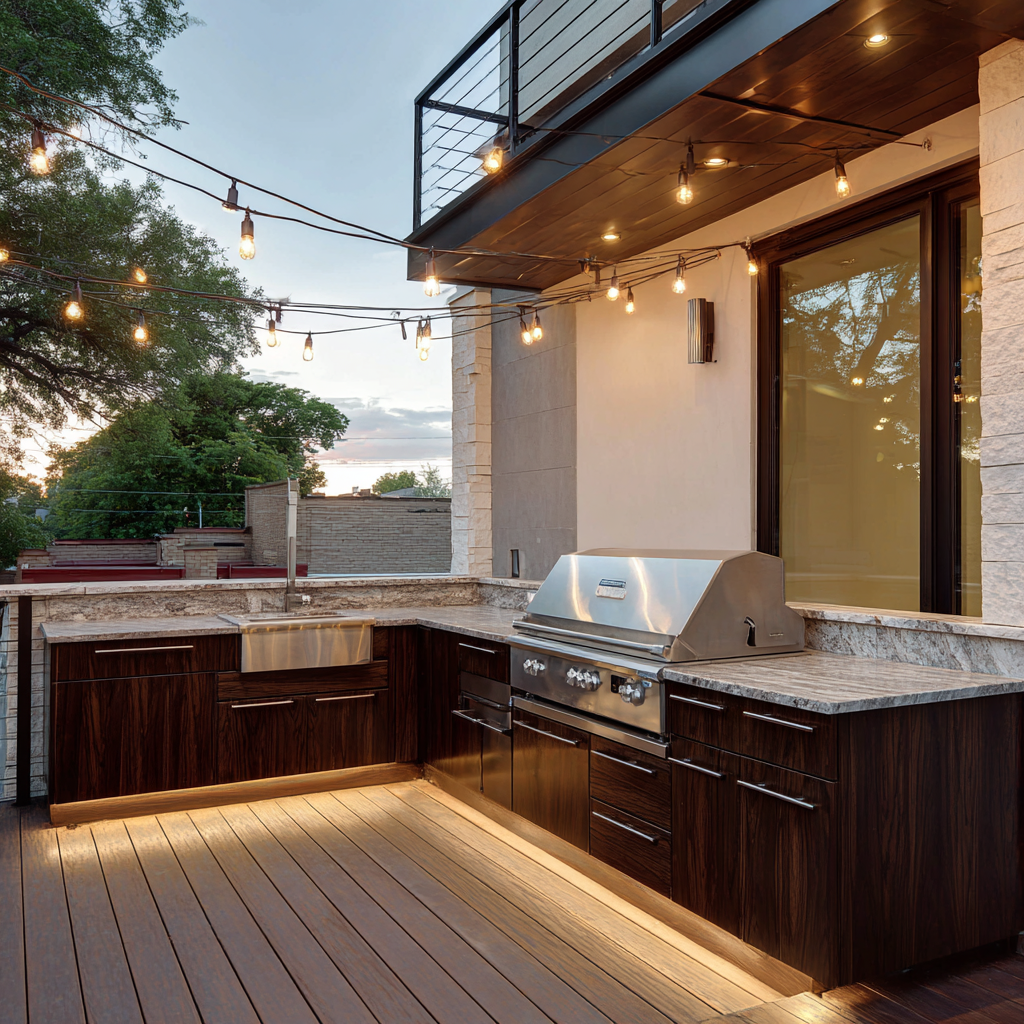
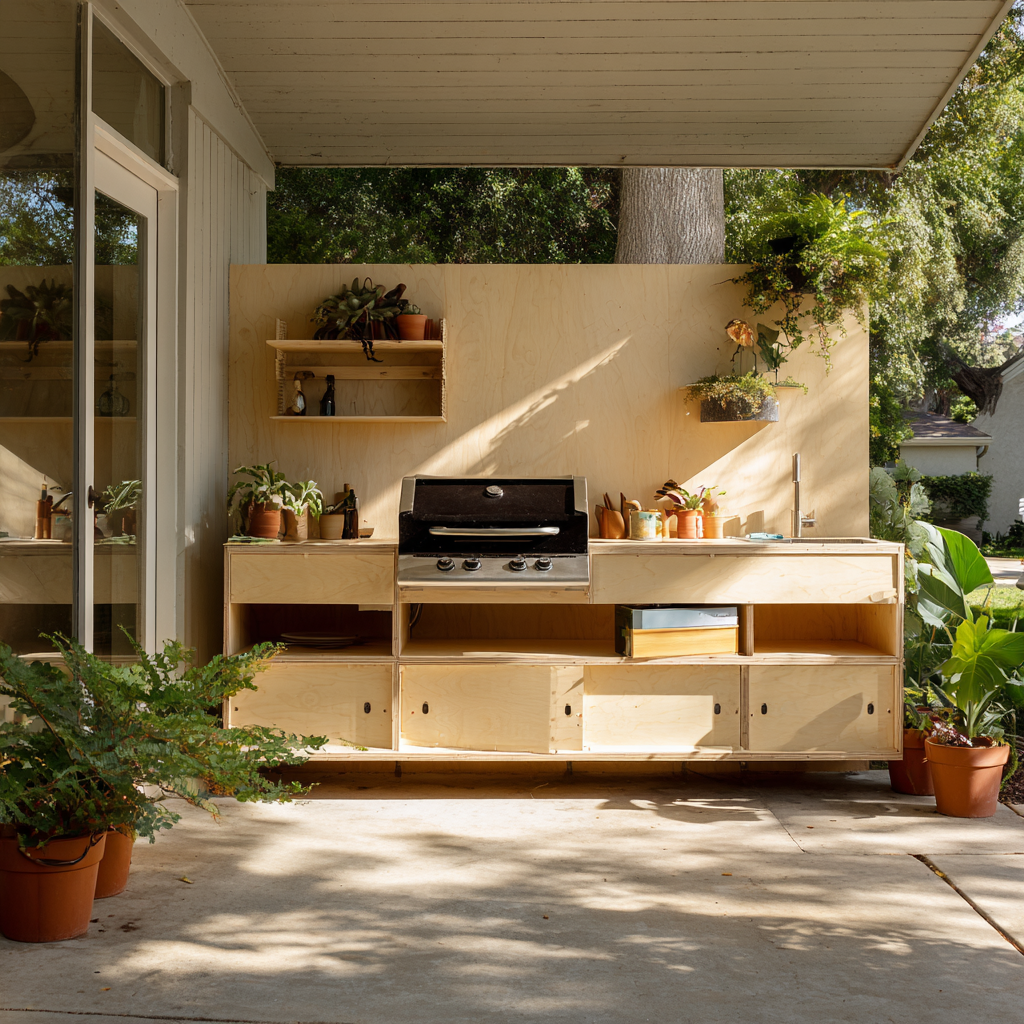
1. DIY Outdoor Deck Kitchen
Build Your Dream Kitchen Right Into Your Existing Deck
This brilliant outdoor kitchen design seamlessly integrates into your existing deck structure, creating a cohesive cooking and entertaining space. What I love most about this approach is how it maximizes your current outdoor real estate without requiring extensive ground preparation or additional foundation work. The design features built-in storage cabinets, dedicated prep space, and room for your favorite grill.
The key design elements include weather-resistant cabinetry, stainless steel hardware, and composite decking materials that withstand the elements beautifully. You can customize the finish with marine-grade stainless steel appliances or powder-coated options in colors that complement your home’s exterior. For implementation, start by reinforcing your deck’s support structure to handle the additional weight of appliances and storage.
Designer tip: When planning your deck kitchen layout, maintain at least 48 inches of clearance behind the grill for safe movement and ventilation.
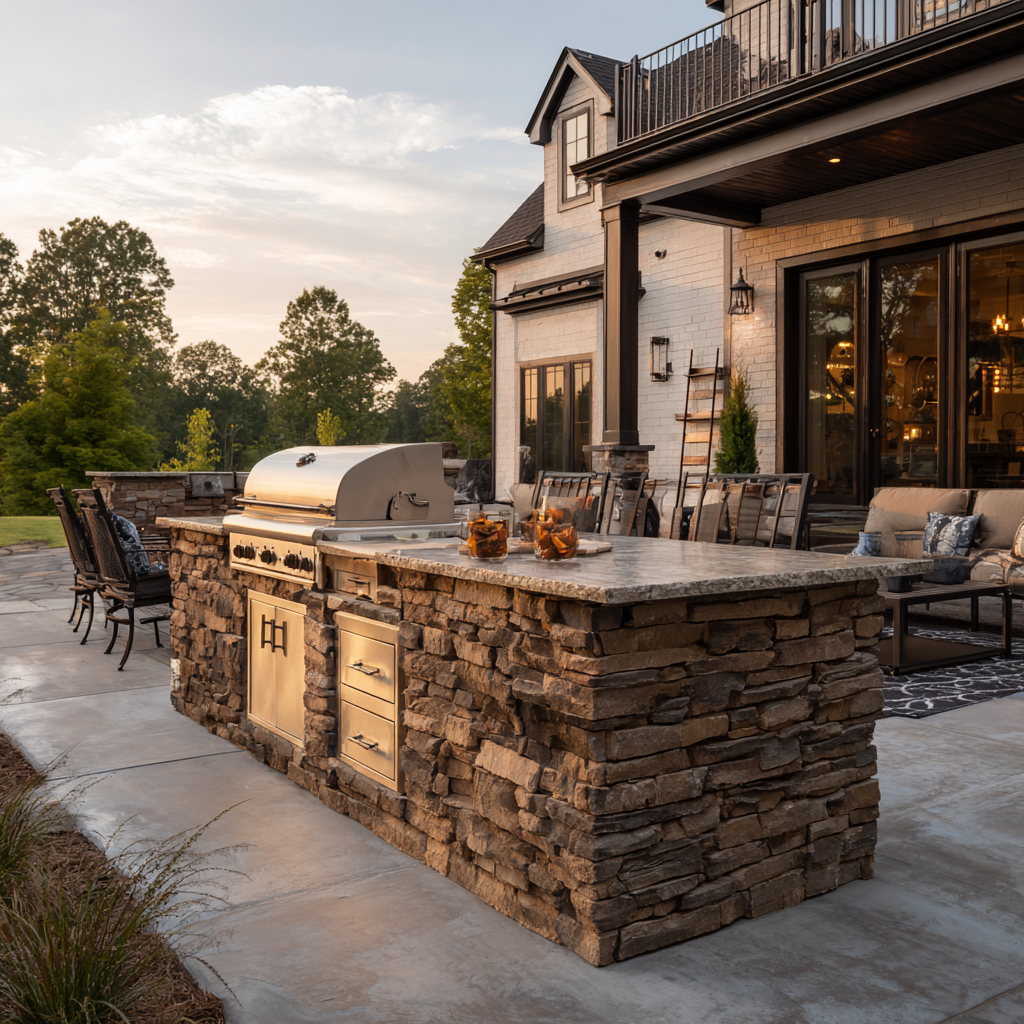
2. DIY Stone Covered Grill Island
Create a Stunning Natural Stone Centerpiece
This impressive grill island transforms any patio or backyard into an elegant outdoor cooking destination. The natural stone covering gives it a timeless, sophisticated appearance that increases your home’s value while providing exceptional functionality. I’ve found that this design works particularly well for larger spaces where you want to make a bold statement.
The beauty lies in the versatility of stone options – from classic fieldstone to modern stacked stone or even cultured stone veneers that are easier to work with. The island typically features a concrete block core for stability, with stone veneer applied over a weather-resistant adhesive system. Color palettes range from warm earth tones to cool grays, allowing you to match your existing landscape design.
For successful implementation, plan for proper drainage around the base and ensure your foundation can support the stone’s weight. This project typically requires 2-3 weekends with helpers for the heavy lifting phases.
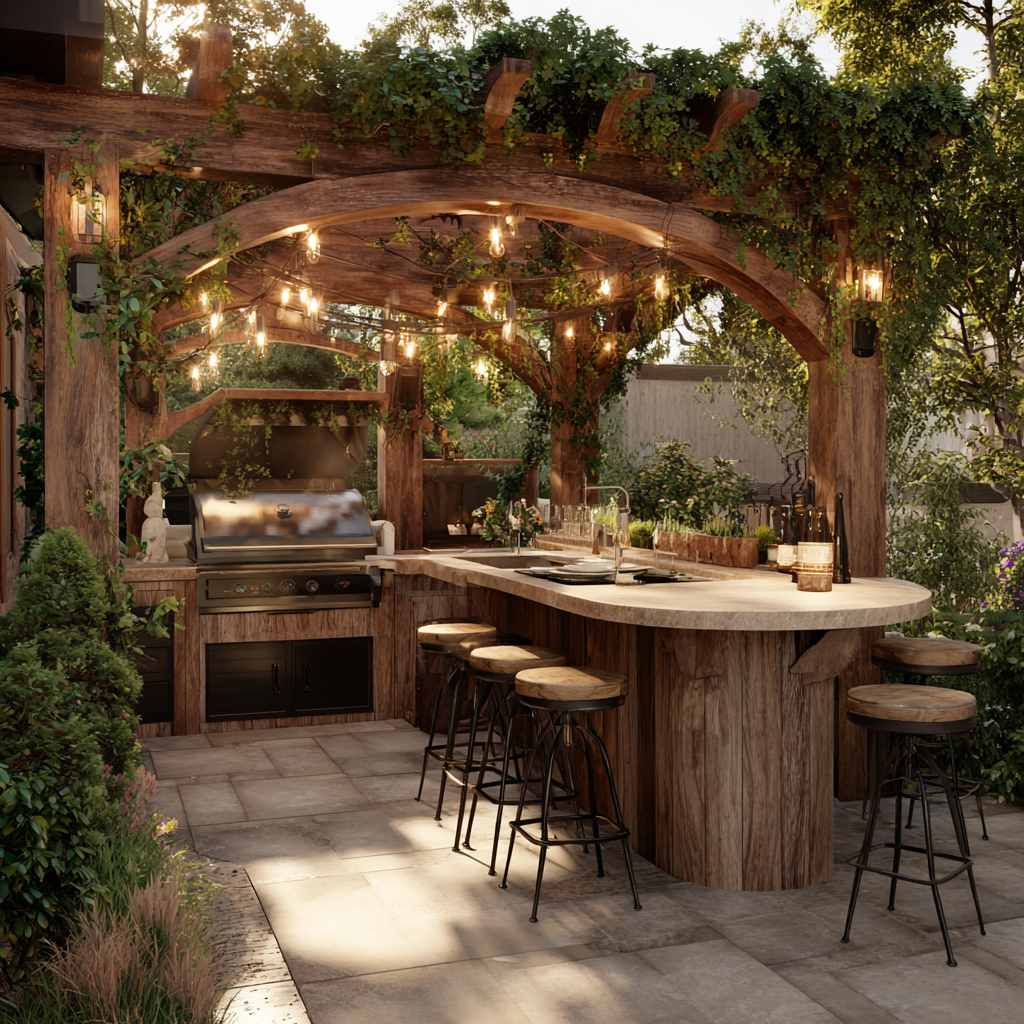
3. Outdoor Kitchen Bar With Pergola
Combine Cooking and Relaxation Under a Beautiful Pergola
This design absolutely captures my heart with its resort-like atmosphere and perfect blend of functionality and relaxation. The overhead pergola provides essential shade during sunny days while creating an intimate, defined space that feels like an outdoor room. The addition of a bar counter transforms this from just a cooking area into a complete entertaining destination.
The pergola structure can be built from cedar, pressure-treated lumber, or even vinyl for low maintenance. Consider adding climbing vines like jasmine or grapevines for natural shade and beauty. The kitchen island beneath typically features a curved or L-shaped design that encourages conversation and interaction while cooking.
Material suggestions include weather-resistant woods like cedar or teak for warmth, or go contemporary with powder-coated aluminum and stone. The bar height should be 42 inches for comfortable standing and eating. Add weather-resistant bar stools and string lights for magical evening ambiance.
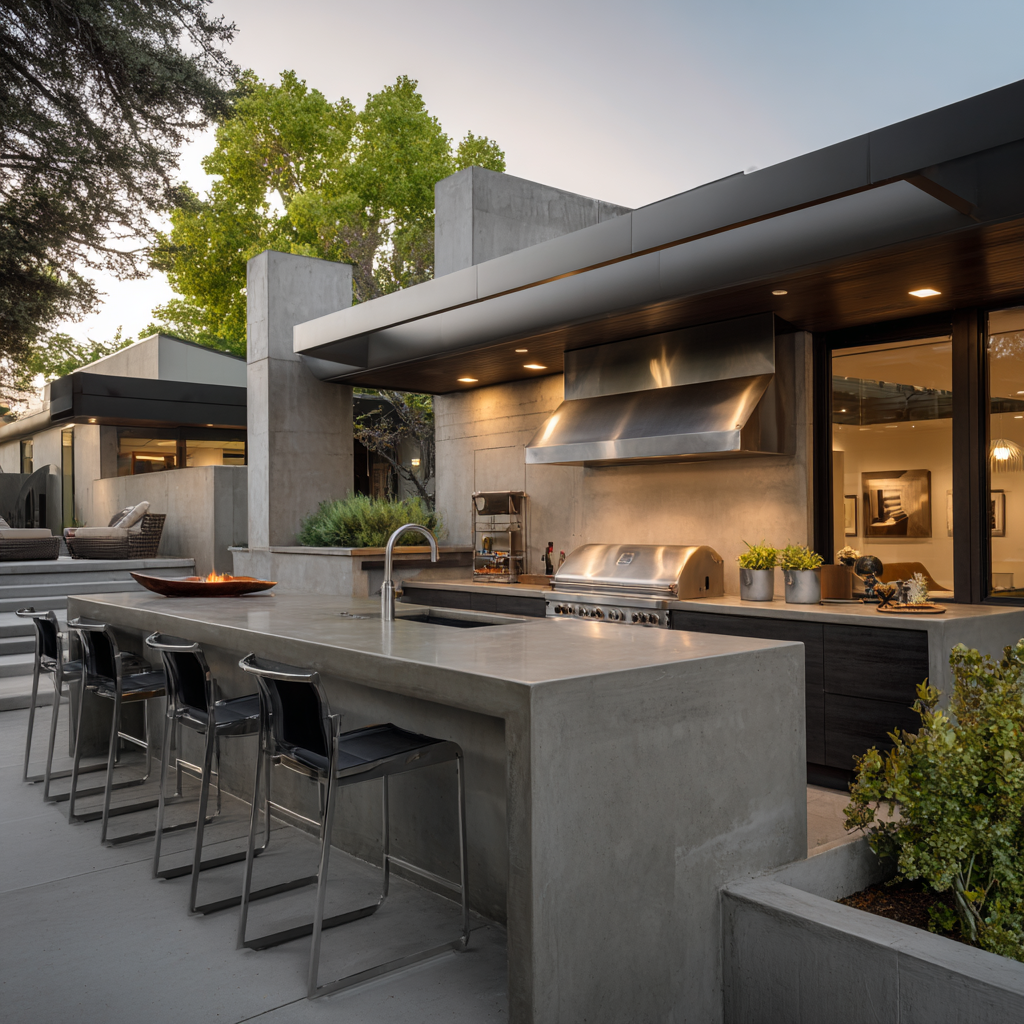
4. DIY Outdoor Kitchen With Concrete Countertops
Modern Durability Meets Custom Style
Concrete countertops have revolutionized outdoor kitchen design, offering unlimited customization possibilities at a fraction of the cost of natural stone. I’m particularly drawn to this option because you can create any color, texture, or even embed decorative elements like glass or shells for a truly unique surface.
The key advantage of concrete is its weather resistance – it won’t crack, warp, or fade like other materials might in extreme temperatures. You can add integral color for consistent hues throughout, or use acid stains for marbled effects. The surface can be polished smooth for a contemporary look or textured for better grip and visual interest.
For implementation, plan for a curing time of at least 28 days for full strength. Start with pre-mixed concrete countertop mixes for consistent results, and don’t forget to seal the surface annually for stain resistance. The steel stud framework beneath provides excellent support while keeping costs reasonable.
Designer tip: Add a subtle warm gray or charcoal color to your concrete mix – it’s more forgiving than bright white and hides minor stains beautifully.
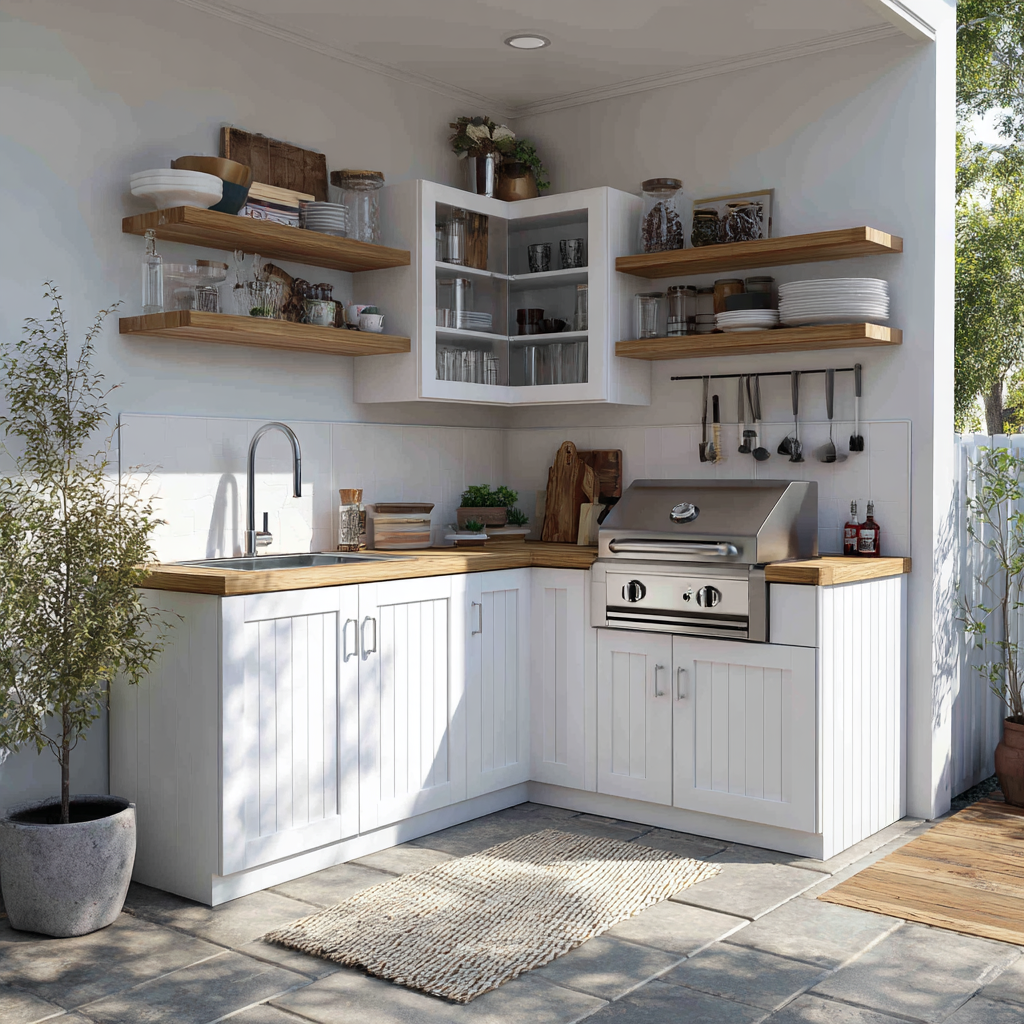
5. DIY Outdoor Kitchenette
Maximize Function in a Compact Design
Sometimes you need serious cooking power in a smaller footprint, and this kitchenette design delivers exactly that. What I find brilliant about this approach is how it incorporates multiple cooking methods, ample storage, and even a prep sink into a surprisingly compact L-shaped design that fits on most patios or deck areas.
The design typically features upper and lower cabinets similar to indoor kitchens, but built with exterior-grade materials and hardware. Marine-grade plywood, stainless steel hinges, and weather-resistant finishes ensure longevity. The layout often includes a built-in grill, side burner, small refrigerator, and sink – everything you need for complete outdoor meal preparation.
Color palettes work best in neutral tones like sage green, warm gray, or classic white that won’t show dirt easily. For practical implementation, plan your plumbing and electrical rough-ins first, then build the cabinet structure around these utilities. The upper cabinets can house dishes, spices, and cooking tools while lower cabinets store larger items.
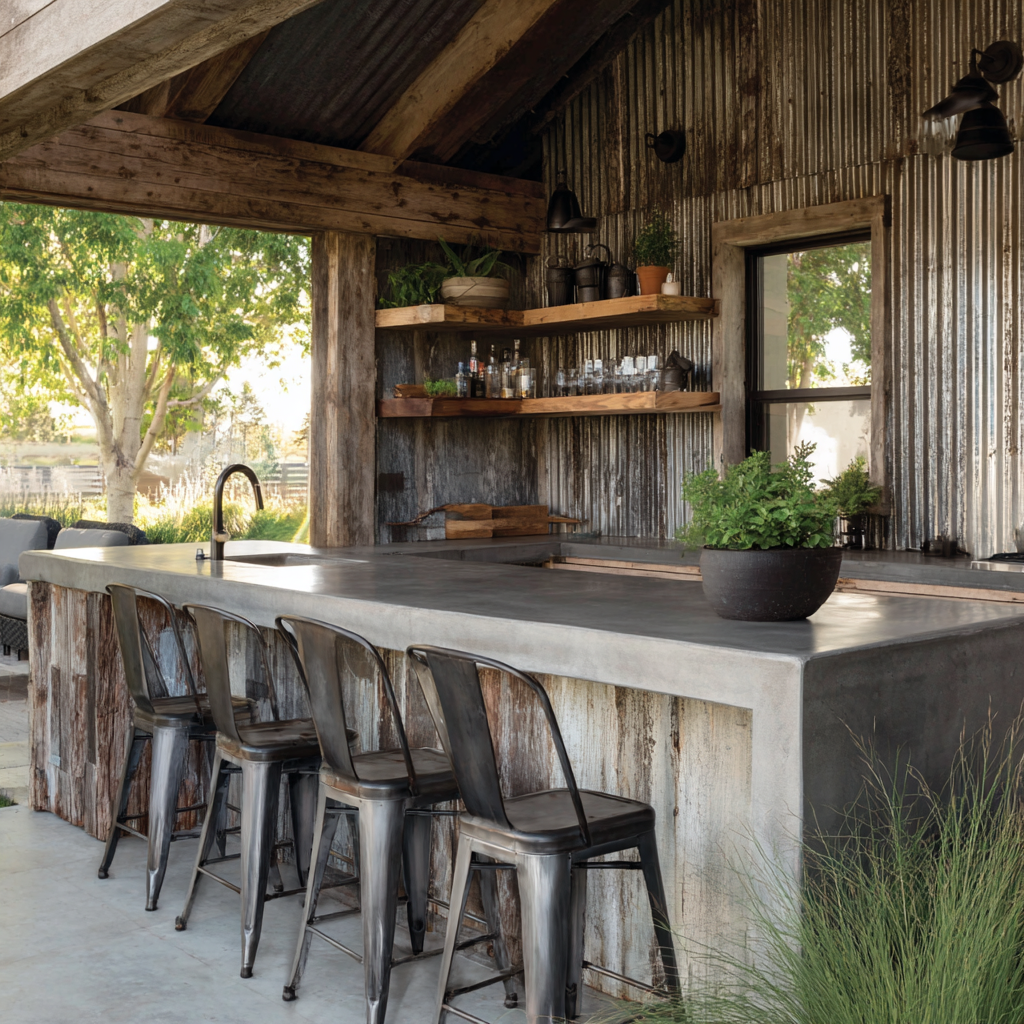
6. DIY Concrete And Corrugated Steel Outdoor Kitchen
Industrial Chic Meets Sustainable Building
This design perfectly captures the modern farmhouse and industrial aesthetic that’s so popular right now. Using reclaimed materials like old barn wood and corrugated steel creates character while keeping costs incredibly low – sometimes under $500 if you can source materials yourself. I love how this approach celebrates the beauty of raw, honest materials.
The corrugated steel provides excellent weather protection and creates interesting visual texture, while concrete offers durability for work surfaces. The combination works especially well in contemporary or transitional outdoor spaces. You can leave the steel natural for authentic patina development, or paint it in bold colors for a more modern look.
Key design elements include exposed steel framing, poured concrete counters, and reclaimed wood accents. The rustic materials pair beautifully with stainless steel appliances for an upscale-casual feeling. For implementation, focus on proper sealing where different materials meet to prevent water infiltration.
Designer tip: Mix textures by combining smooth concrete with weathered wood and industrial steel – the contrast creates visual depth and interest.
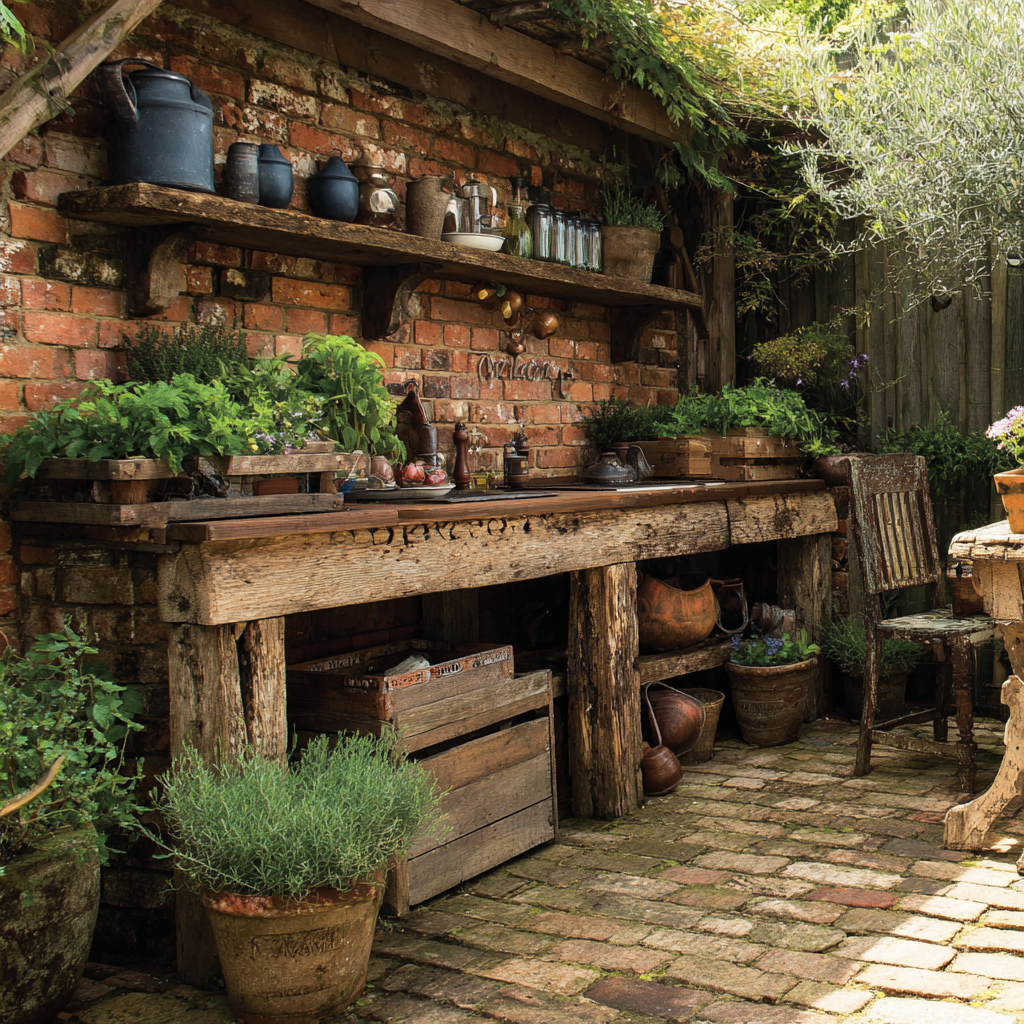
7. Upcycled Wood And Brick Outdoor Kitchen
Embrace Rustic Charm With Reclaimed Materials
There’s something deeply satisfying about creating beauty from materials that might otherwise be discarded. This upcycled design combines the warmth of weathered wood with the timeless appeal of brick, creating an outdoor kitchen that feels like it’s been part of your landscape for decades. The rustic aesthetic works particularly well with traditional and farmhouse-style homes.
The beauty of this approach lies in the imperfections – weathered wood posts, varied brick colors, and the natural patina that comes with age. These elements create character that’s impossible to replicate with new materials. The design typically surrounds your existing grill with custom-built storage and prep areas using reclaimed fence posts, old bricks, or salvaged pavers.
For color harmony, let the natural materials guide your palette – warm browns, aged reds, and soft grays create a cohesive look. Practical tips include sealing wood surfaces annually and using outdoor-rated wood stain for protection. The project can often be completed in a single weekend with basic carpentry skills.
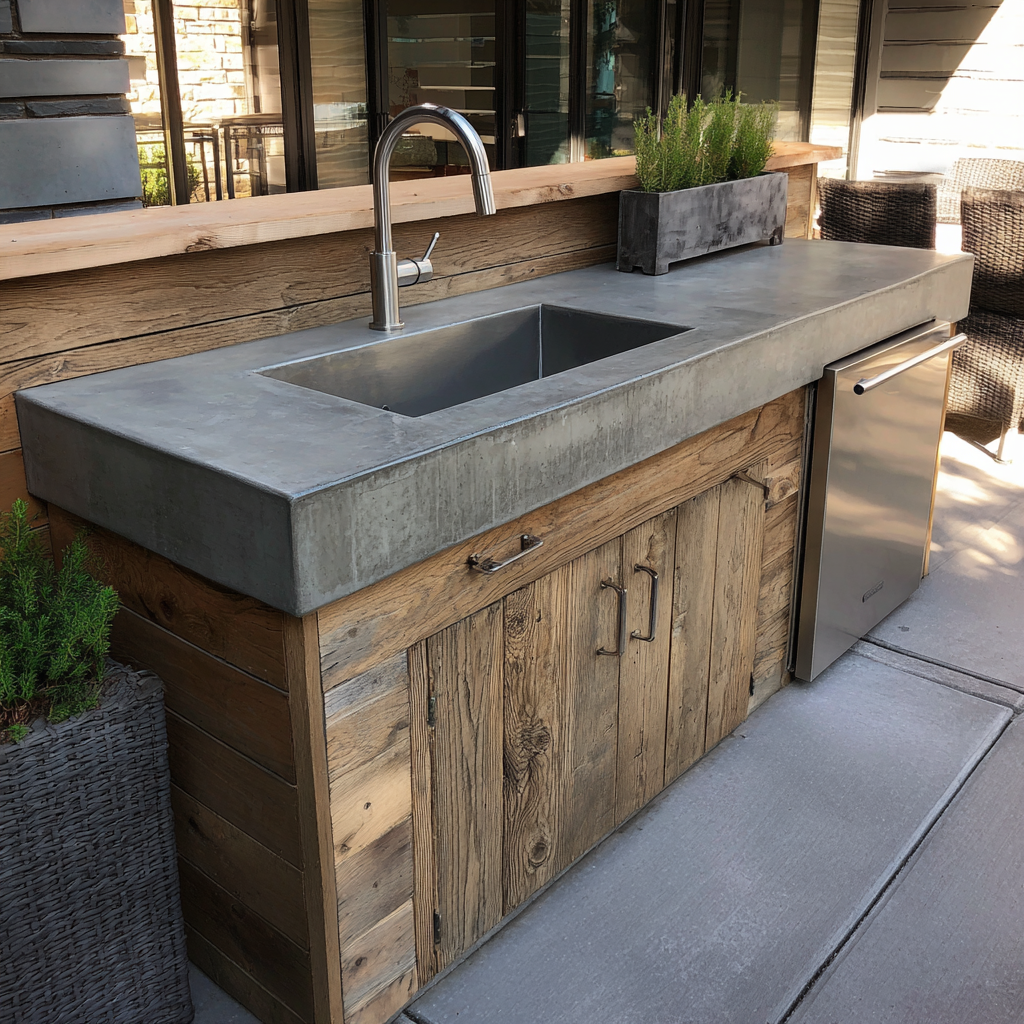
8. DIY Poured Concrete Outdoor Kitchen Countertops
Master the Art of Custom Concrete Surfaces
Creating your own poured concrete countertops opens up a world of design possibilities while delivering professional results at DIY prices. What I find most exciting about this technique is the ability to create exactly the size, shape, and color you want – no compromising with standard sizes or limited color options like you’d face with prefab materials.
The process involves building wooden forms, mixing and pouring concrete, then finishing the surface to your desired texture. You can create integrated drainboards, custom curves, or even embed lighting elements for dramatic evening effects. The key is understanding that concrete continues to cure and strengthen for weeks, developing its full durability over time.
Material suggestions include fiber-reinforced concrete mixes for crack resistance, and high-quality sealers for stain protection. Color options range from natural gray to custom integral colors, or you can apply acid stains after curing for unique mottled effects. The technique works well with any cabinet style beneath, from modern steel frames to traditional wood construction.
9. Super Easy 10 Step DIY Outdoor Kitchen
Follow a Simple Blueprint for Guaranteed Success
Sometimes the best projects are the ones that break down complex builds into manageable steps, and this 10-step outdoor kitchen plan does exactly that. I appreciate how this design removes the guesswork by providing a clear roadmap from foundation to finished kitchen. The plywood base construction makes it accessible for beginners while still delivering professional-looking results.
The genius of this approach lies in its modular design – you can easily customize the size to fit your space and cooking needs. The wooden frame construction is both cost-effective and forgiving for first-time builders. Standard materials include exterior-grade plywood, pressure-treated lumber, and basic hardware store supplies that won’t strain your budget.
Key features include built-in storage compartments, dedicated spaces for a grill and mini-fridge, and an optional prep sink. The design works beautifully with various finishes – paint it to match your home’s trim, stain it for a natural wood look, or clad it with stone veneer for an upscale appearance. Most builders complete this project in two weekends with basic power tools.
10. Simple DIY Outdoor Grilling Island
Perfect Starter Project for New DIY Enthusiasts
This streamlined grilling island proves that you don’t need complexity to achieve great style and functionality. What I love about this design is how it elevates a basic grill setup into something that looks intentionally designed and built-in, all while keeping the project manageable for weekend warriors and first-time outdoor kitchen builders.
The island typically surrounds your existing grill with storage cabinets and prep space, instantly transforming your cooking area from amateur to impressive. The design focuses on clean lines and practical storage rather than elaborate features, making it perfect for smaller patios or budget-conscious builds.
Material choices include weather-resistant cabinet-grade plywood with marine hardware, or you can opt for composite materials that require minimal maintenance. Popular color schemes include classic white for a clean look, warm gray for contemporary appeal, or natural wood stains that complement existing deck finishes. The storage compartments are perfect for grilling tools, propane tanks, and outdoor dinnerware.
Designer tip: Add interior lighting to your cabinets – battery-operated LED strips make evening cooking much easier and add a professional touch.
11. Repurposed Cabinet Outdoor Kitchen
Transform Salvaged Materials Into Outdoor Gold
One of my favorite budget-friendly approaches involves giving new life to salvaged kitchen cabinets from thrift stores, renovation projects, or online marketplaces. This sustainable building method can create a stunning outdoor kitchen for a fraction of new construction costs while keeping perfectly good materials out of landfills.
The key to success with repurposed cabinets lies in proper weatherproofing and strategic updates. Strip old finishes, sand thoroughly, and apply marine-grade primer and paint designed for harsh outdoor conditions. Replace hardware with stainless steel or powder-coated options that won’t rust, and add weather stripping around doors for better protection.
Design elements often include mixing different cabinet styles for an eclectic, collected-over-time appearance, or painting everything in a cohesive color for a more uniform look. Adding stone or brick veneer to the base creates visual weight and helps tie the kitchen into your landscape. This approach works particularly well for cottage, farmhouse, or casual outdoor living spaces.
12. DIY Portable Outdoor Kitchen
Flexibility Meets Functionality on Wheels
For renters, frequent movers, or those who simply want maximum flexibility, this portable outdoor kitchen design offers all the benefits of a built-in setup with the freedom to relocate as needed. I’m particularly drawn to this solution because it allows you to test different locations in your yard before committing to a permanent installation.
The design typically features heavy-duty casters for easy movement, fold-down work surfaces to maximize prep space, and clever storage solutions that keep everything organized and accessible. Weather protection becomes crucial since the unit needs to withstand the elements year-round or be stored when not in use.
Construction materials focus on lightweight but durable options like aluminum framing, marine-grade plywood, and stainless steel surfaces. The compact design usually includes space for a portable grill, small cooler or mini-fridge, and essential cooking tools. Many versions feature fold-out side tables that double the work surface when needed but fold flat for storage or transport.
Designer tip: Install quick-disconnect fittings for gas lines if you plan to use a built-in grill – this makes moving the unit much safer and easier.

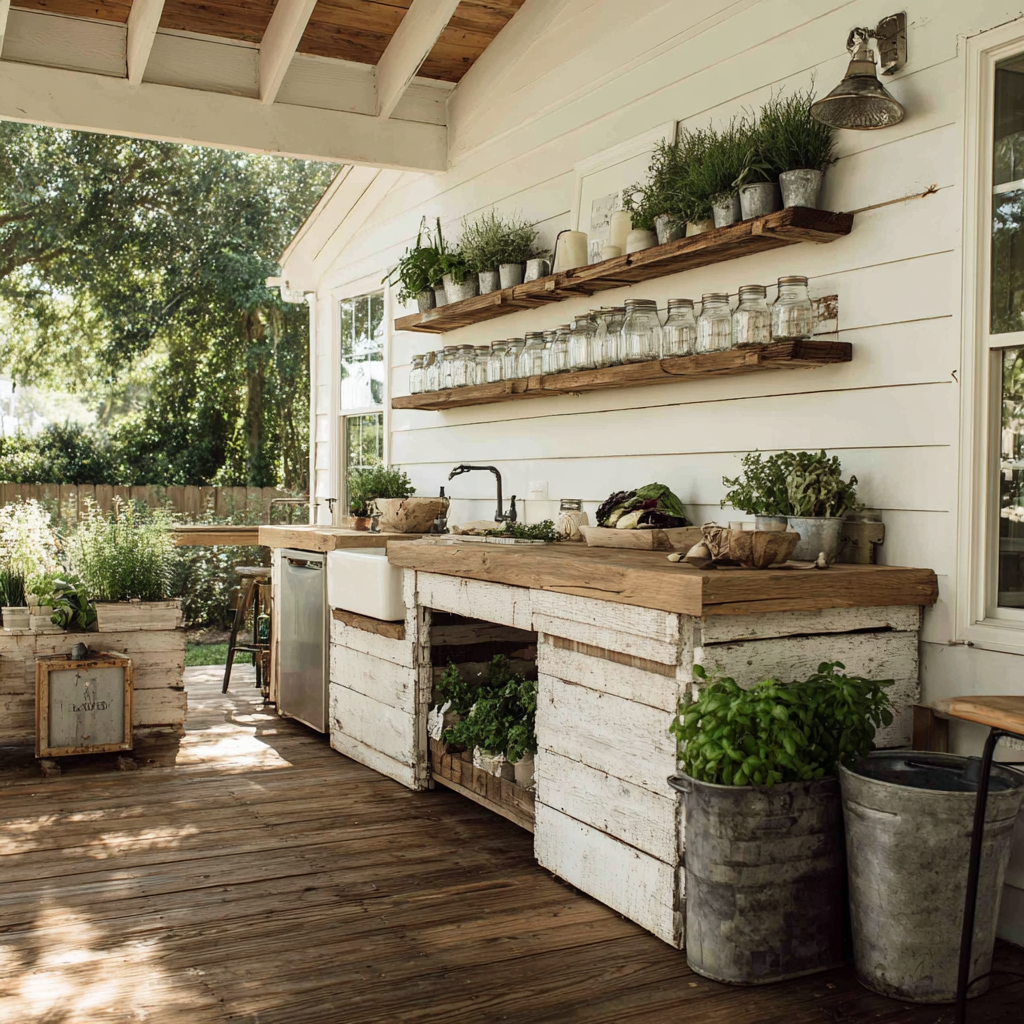
13. DIY Rustic Farmhouse Outdoor Kitchen
Capture Country Charm With Modern Functionality
The farmhouse aesthetic continues to captivate homeowners with its perfect blend of rustic charm and practical functionality. This outdoor kitchen design embraces weathered wood, vintage-inspired hardware, and that lived-in look that makes everything feel welcoming and comfortable. What I find irresistible about this style is how it makes entertaining feel effortless and authentic.
Key design elements include reclaimed wood surfaces, galvanized metal accents, and a neutral color palette of whites, creams, and natural wood tones. The typical layout features open shelving for displaying vintage dishes and mason jar storage, along with practical closed storage for modern conveniences. Shiplap siding, barn-style hardware, and farmhouse sinks complete the authentic look.
For implementation, focus on weathered finishes that improve with age rather than deteriorate. Use milk paint or chalk paint for that perfectly imperfect vintage appearance, and don’t be afraid of mixing textures like smooth painted surfaces with rough-hewn beams. The style pairs beautifully with herb gardens, vintage outdoor furniture, and string lighting for magical evening ambiance.
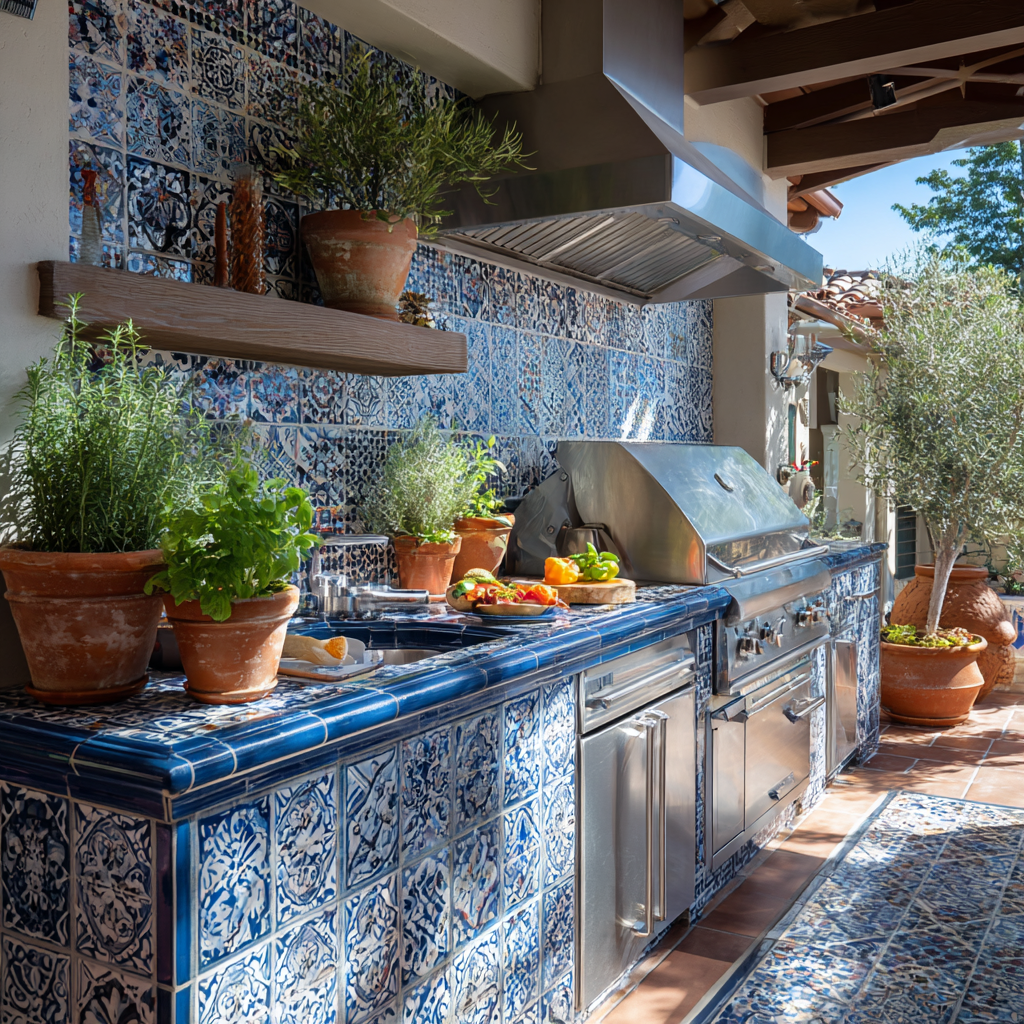
14. DIY Tiled Outdoor Kitchen
Add Color and Pattern With Weather-Resistant Style
Tile offers incredible versatility for outdoor kitchen design, allowing you to introduce color, pattern, and texture while maintaining excellent weather resistance. I’m constantly amazed by the transformation that beautiful tile work can bring to a basic outdoor kitchen frame – it’s like jewelry for your cooking space.
The key to successful outdoor tiling lies in material selection and proper installation. Porcelain tiles offer superior weather resistance compared to ceramic, while natural stone provides timeless beauty that improves with age. Consider large-format tiles for a contemporary look, or classic subway tiles for timeless appeal. Bold patterns like Moroccan or geometric designs can create stunning focal points.
Color strategies include using neutral tiles as a base with colorful accent tiles for interest, or going bold with a single dramatic color that complements your home’s exterior. For practical implementation, ensure proper waterproofing behind tiles, use outdoor-rated grout and sealers, and plan for thermal expansion in extreme climates. The tile surface works beautifully over concrete block, steel stud, or wooden framework.
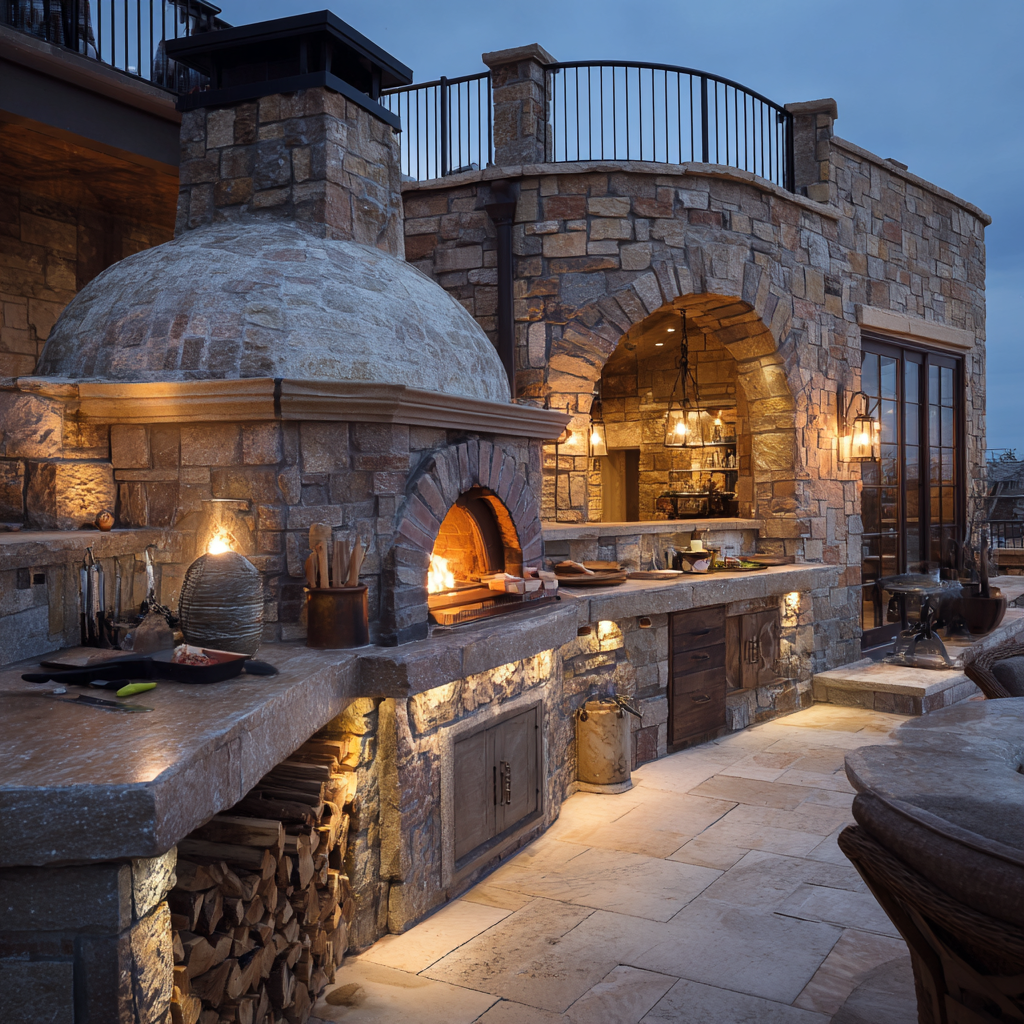
15. DIY Outdoor Kitchen With Wood Fired Pizza Oven
Create the Ultimate Outdoor Cooking Experience
Nothing quite compares to the magic of wood-fired cooking, and incorporating a pizza oven into your outdoor kitchen creates an irresistible focal point that will make your backyard the neighborhood gathering spot. I’ve found that the combination of grilling capabilities with authentic pizza-making transforms ordinary cookouts into memorable culinary adventures.
Modern pizza oven kits make this dream more accessible than ever, with pre-fabricated dome units that install into custom-built surrounds. The key design elements include proper insulation, adequate ventilation, and heat-resistant materials throughout the cooking area. The oven typically requires a substantial concrete foundation and chimney system for safe operation.
Integration with the rest of your outdoor kitchen requires careful planning for workflow – you’ll want prep space nearby, storage for wood and pizza tools, and adequate clearance for the intense heat generated. Popular surround materials include fire brick, natural stone, or stucco finishes that complement your home’s architecture. The investment in time and materials pays dividends in entertainment value and property enhancement.
Designer tip: Plan for a dedicated wood storage area that keeps fuel dry and easily accessible – wet wood creates excessive smoke and poor cooking performance.
Conclusion
Building your own outdoor kitchen doesn’t have to be an overwhelming project or a budget-breaking investment. Whether you’re starting with a simple grilling island that can be completed in a weekend or embarking on an elaborate setup with concrete countertops and a wood-fired pizza oven, there’s a DIY solution that matches your skill level, timeline, and budget.
What I find most rewarding about these projects is how they transform not just your backyard space, but your entire approach to outdoor living and entertaining. Suddenly, family dinners move outside, friends linger longer at gatherings, and you discover the joy of cooking under the stars. Each of these 15 designs offers a different path to that same destination – a beautiful, functional outdoor cooking space that becomes the heart of your backyard.
The key to success lies in honest assessment of your skills, realistic timeline expectations, and choosing materials that will weather beautifully in your climate. Don’t be afraid to start small with a basic design and expand over time, or to mix and match elements from different plans to create something uniquely suited to your space and needs.
Remember that the best outdoor kitchen is the one you’ll actually use and enjoy. Whether that’s a simple portable cart or an elaborate stone island with all the bells and whistles, the magic happens when you fire up that grill and start creating memories with the people you love.
Frequently Asked Questions
How much does it typically cost to build a DIY outdoor kitchen?
DIY outdoor kitchen costs vary dramatically based on size, materials, and appliances, but you can expect to spend anywhere from $500 for a basic portable setup to $8,000 for an elaborate built-in design with premium appliances. Most homeowners find a sweet spot around $2,000-4,000 for a substantial grilling island with storage, concrete countertops, and mid-range appliances. The key to controlling costs is planning your build in phases, shopping sales for materials, and doing the labor yourself.
What permits do I need for an outdoor kitchen installation?
Permit requirements vary significantly by location, but most areas require permits for electrical work, plumbing connections, and permanent structures over a certain size. Gas line installations almost always require professional work and permits. Before starting your project, contact your local building department to understand specific requirements in your area. Many simple DIY designs that don’t require utilities can often be built without permits, but it’s always better to check first.
How do I protect my outdoor kitchen from weather damage?
Weather protection starts with material selection – choose marine-grade hardware, exterior-rated wood products, and weatherproof finishes from the beginning. For ongoing protection, invest in quality covers for appliances, seal wood surfaces annually, and ensure proper drainage around your kitchen area. In harsh climates, consider designs that allow you to remove or cover sensitive components during off-seasons. Regular maintenance like cleaning, re-sealing, and touch-up painting will extend your kitchen’s life significantly.
Can I build an outdoor kitchen if I’m a beginner DIYer?
Absolutely! Many of these designs are perfect for beginners, especially the simpler grilling islands and portable options. Start with projects that use basic carpentry skills and standard lumber sizes. The 10-step outdoor kitchen and repurposed cabinet designs are particularly beginner-friendly. Consider partnering with more experienced friends for complex tasks like concrete work or electrical connections, and don’t hesitate to hire professionals for gas line installations or major electrical work. The key is choosing a project that matches your current skill level while pushing you to learn new techniques.